Category Archives: Stream
SonTek HydroBoard – Operate Equipment
In this package, an Acoustic Doppler Profiler is mounted on a floatable platform, which resembles a Boogie Board. Position is tracked using a GPS on the boat that communicates with a land-based station and is, therefore, capable of centimeter-accurate results. At least four transects are required for an accurate measurement.
GPS
- Set up tripod in alignment with cross section
- Install charged batteries and mount Real Time Kinematic (RTK) GPS on top of tripod
- Set up GPS in view of cross-section to be measured and make sure you have clear view of the sky
- Mount antenna on side of GPS
Floatable Platform
- Mount tracker on boat
- Mount Acoustic Doppler Profiler (ADP) on boat; be sure to set ADP to yellow line
- Mount Power Communication Module (PCM) and connect cables from antenna and ADP to PCM
Laptop
The initial setup of the HydroBoard is done using a laptop connected to the ADP via Bluetooth connection.
- Plug in dongle (external Bluetooth adapter) to laptop
- Plug in power cord from dongle to laptop
- Press On/Off switch to turn on dongle
- Open RiverSurveyor Live
- Turn on power switches on ADP and PCM (GPS has two lights – power and GPS; (PCM has four lights – power, radio, RTK and GPS)
- Connect to River Surveyor on laptop
- Make sure Parani Bluetooth Connection is checked
- Press Connect
- Select S5 Unit
- Press Connect
- Bring up startup screen (goal: make all red lines turn green)
- Go to bottom of screen and perform System Test
- Dialog box opens; press Start
- Dialog box opens to verify system pass; press Close
- Press Change Site Information and input appropriate information (note: boat is R boat) – not all fields are required
- Press Compass Calibration; dialog box opens; press Start
- During calibration, a second person should pick up the boat and wiggle it back and forth
- Dialog box will indicate Pass if the calibration is successful (calibration score should be close to 10, a score of 9 is acceptable)
- Close window
- Press System Settings and set the following fields to these values
- Transducer Depth – 0.24 (note: will change due to new board)
- Screening Distance – 0
- Salinity – (variable – use salinity meter to determine correct value)
- Magnetic Declination – 12.5
- Track Reference – bottom track
- Depth Reference – vertical beam
- Coordinate System – ENU
- Smart Pulse – enabled
- Press Enter
Blackberry
Once the initial setup is completed, a handheld PDA is used to enter data and track progress of the ADP.
- Disconnect laptop Bluetooth connection and connect Blackberry Bluetooth (password: 1610)
- Press soft key Start to get to Programs
- Select River Surveyor Live
- Search for unit
- Press Connect when found
- Press Start System
- Press Start Edge
- Fill in parameters and press OK
- Deploy fins on HydroBoard and place unit in water
- Press Start Edge and wait until you get at least 10 samples at the edge
- Set bank and distance from center of HydroBoard to edge of water; press OK
- Pull HydroBoard across creek at a consistent speed and no faster than water velocity
- Once across the cross-section and after 10 samples at edge, enter distance and press End Edge
- Press End Transect
- For next measurement, press Continue
- Repeat steps 6-10 a minimum of four times
SonTek FlowTracker – Transfer Data
- Connect unit to computer using 5-pin cable and serial connection (with or without USB adapter)
- Press yellow power button to turn unit on
- Open SonTek FlowTracker program
- Press Connect to a FlowTracker
- On Connect to serial port dialog box, select proper COM port and confirm Baud rate: 9600
- Press Connect
- Press Recorder; dialog box opens
- Select files for download (e.g., 800A0806.15)
- Press Browse to navigate to destination folder (e.g., Q:\STATIONS\TL\800a\2015\Misc)
- Press Download
- Confirm .WAD files transferred to proper location
- To erase .WAD files, select all appropriate (e.g., 800A0806.15) and press Format
- When completed, press yellow power button to turn unit off and disconnect unit from computer
- In Windows Explorer, navigate to folder (e.g., Q:\STATIONS\TL\800a\2015\Misc), select file (e.g., 800A0806.15.WAD) and rename using SiteMonthDayYear format (e.g., 800a080615.WAD)
- In FlowTracker, press Open a FlowTracker file, navigate to newly named .WAD file and press Open
- Press Printer button, print first page and attach to front sheet from site visit
SonTek FlowTracker – Operate Equipment
- Press yellow power button to turn unit on
- Press Enter to get to main menu
- To begin a measurement, press 3 (Start Data Run)
- Press 1 (Name), input name using SiteMonthDay format (e.g., 800A0806) and press Enter **this represents a change from the normal naming convention because the FlowTracker only allows 8 characters for the site name – this will be corrected later during the data transfer phase**
- Press 2 (Extension), input the two-digit year (e.g., 15) and press Enter
- Press 9 (Accept name)
- On next screen, press 1 (Site), input name using SiteMonthDayYear format (e.g., 800A080615) and press Enter
- Press 2 (Operator), input initials of hydrographer (e.g., TL) and press Enter
- Press 9 (Start)
- On next screen, press Enter
- Place meter in water away from obstacles and press 1 (Run Test) to perform the Automatic QC Test
- If starting transect at Right Edge of Water, press 4 (REW/LEW) to toggle to REW
- Press Set Location, input tagline distance at edge of water (usually right side) and press Enter
- Press Set Depth, input depth reading (usually 0) and press Enter
- Move to first vertical, input tagline distance and depth using steps 13 and 14
- Set meter to 0.6 depth of vertical and press Measure
- Review error messages and press Enter to move to next
- When error messages are complete, Press 1 (Accept) to move to next vertical
- Repeat steps 15 – 18 for each vertical along remainder of cross-section
- When finishing edge of water is reached, press 1 (End Section) twice
- Review error messages and press Enter to move to next; press 1 (Accept) to move to QC screen
- Press Enter to move to discharge calculation screen
- Presss – (Calculate Discharge) twice
- To save measurement, press 0
- Press yellow power button to turn unit off
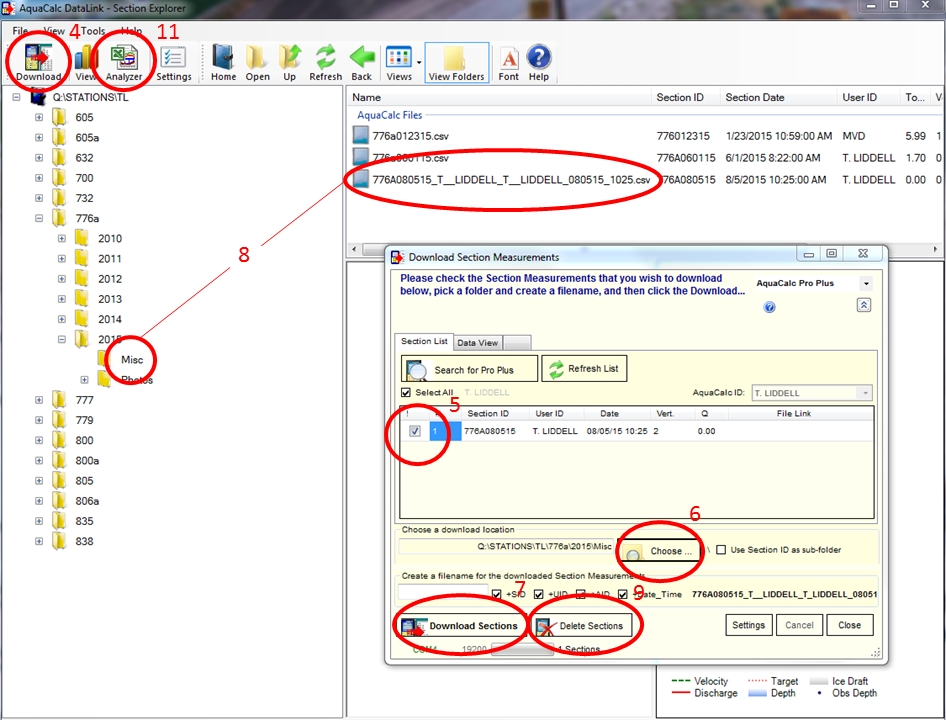
JBS AquaCalc Pro+ – Transfer Data
- Connect AquaCalc Pro+ to compter via USB cable and press On/Off
- Press 3 (Connections) and verify that Connection is set to USB
- Open AquaCalc DataLink3
- Press Download
- In Download Section Measurements dialogue box, select measurement to be downloaded (e.g., 776A080515)
- Under Choose a download location, press Choose and navigate to appropriate folder location (e.g., Q:\STATIONS\TL\776a\2015\Misc)
- Press Download Sections
- Verify transfer of .CSV file to appropriate file location (e.g., 776A080515_T__LIDDELL_T__LIDDELL_080515_0709.csv)
- To remove discharge measurement from Aquacalc Pro+, re-select section and press Delete Sections
- To rename tranferred file so that it follows the SiteMonthDayYear naming convention (e.g., 776a080515), right-click CSV file and select Rename
- Press Analyzer; MS Excel document opens
- Select Import and Edit Here tab, press Import AquaCalc Pro Output File, navigate to the newly transferred file and press Open
- Select Summary for Printing (5×8) tab, print first page and attach to front sheet from site visit
JBS AquaCalc Pro+ – Operate Equipment
- To turn unit on, press On/Off
- To start a new measurement, press the 2 (Sections) key
- Select a blank section by pressing appropriate numbered key
- Press the New softkey
- To enter new Site ID, press 1 (SID), enter name in SiteMonthDayYear format (e.g., 776a072015) and press Enter
- To change meter type, press 3 (Meter), select proper meter (default is Standard so make sure to switch to Pygmy, if applicable)
- Press Enter to get to beginning of measurement
- Water Edge appears on screen. Press 3 (Distance) to input tagline distance at edge of water (usually right side) and press Enter
- Press New Vertical, input tagline stationing and press Enter
- Press 6 (Stream Depth), input depth reading and press Enter
- Set meter to 0.6 depth of vertical and press Measure on keypad (Time will start counting upwards and then reset after first revolution is recorded; Time will stop counting after first revolution beyond 40 seconds)
- Repeat steps 9 – 11 for each vertical along remainder of cross-section
- When finishing edge of water is reached, press New Vertical and then Enter
- Press Edge, which will automatically default depth to 0
- To save measurement, press Menu
- To turn unit off, press On/Off